Pages

Monday 23 September 2013

Writing into Excel file using JExcel API

In this post we will learn how to write data into Excel sheet using JExcel API.

Below is Java code for writing the data into excel sheet:

WriteExcel.java
package com.technsolution;

import java.io.File;
import java.io.IOException;
import java.util.Locale;

import jxl.CellView;
import jxl.Workbook;
import jxl.WorkbookSettings;
import jxl.format.UnderlineStyle;
import jxl.write.Label;
import jxl.write.Number;
import jxl.write.WritableCellFormat;
import jxl.write.WritableFont;
import jxl.write.WritableSheet;
import jxl.write.WritableWorkbook;
import jxl.write.WriteException;
import jxl.write.biff.RowsExceededException;


public class WriteExcel {
  private WritableCellFormat timesBold;
  private WritableCellFormat times;
  private String outputFile;
  
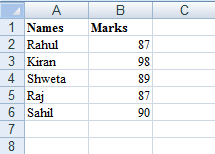
  String [] name = {"Rahul","Kiran","Shweta","Raj","Sahil"};
  int [] marks = {87,98,89,87,90};
  
  public static void main(String[] args) throws IOException, WriteException {
 WriteExcel we = new WriteExcel();
 we.setOutputFile("D:/Output.xls");//Location of output file
 we.write();
  }
  
  public void setOutputFile(String outputFile) {
 this.outputFile = outputFile;
  }

  public void write() throws IOException, WriteException {
    
 File file = new File(outputFile);
 WorkbookSettings wbSettings = new WorkbookSettings();

 wbSettings.setLocale(new Locale("en", "EN"));

 WritableWorkbook workbook = Workbook.createWorkbook(file, wbSettings);//creating workbook
 workbook.createSheet("Report", 0);//creating the first sheet of the workbook
 WritableSheet excelSheet = workbook.getSheet(0);
 createLabel(excelSheet);
 createContent(excelSheet,name,marks);

 workbook.write();
 workbook.close();
  }

  private void createLabel(WritableSheet sheet) throws WriteException {
 // Lets create a times font
 WritableFont times10pt = new WritableFont(WritableFont.TIMES, 10);
 // Define the cell format
 times = new WritableCellFormat(times10pt);
   
 // Create a bold font
 WritableFont times10ptBoldUnderline = new WritableFont(WritableFont.TIMES, 10, WritableFont.BOLD, false,
 UnderlineStyle.NO_UNDERLINE);
 timesBold = new WritableCellFormat(times10ptBoldUnderline);
 // Lets automatically wrap the cells
 timesBold.setWrap(true);

 CellView cv = new CellView();
 cv.setFormat(times);
 cv.setFormat(timesBold);

 // Write a few headers
 addCaption(sheet, 0, 0, "Names");
 addCaption(sheet, 1, 0, "Marks");
  }

  //Method for adding data to the columns
  private void createContent(WritableSheet sheet, String[] names, int[] marks) throws WriteException,
      RowsExceededException {
 
 for (int i = 1; i <= names.length; i++) {
 // First column
 addLabel(sheet, 0, i, names[i-1]);
 // Second column
 addNumber(sheet, 1, i, marks[i-1]);
 }
  }
  
  //Method for adding Headers of the columns
  private void addCaption(WritableSheet sheet, int column, int row, String s)
throws RowsExceededException, WriteException {
 Label label;
 label = new Label(column, row, s, timesBold);
 sheet.addCell(label);
  }  

  //Method for adding string values to excel sheet
  private void addLabel(WritableSheet sheet, int column, int row, String s)
throws WriteException, RowsExceededException {
 Label label;
 label = new Label(column, row, s, times);
 sheet.addCell(label);
  }

  //Method for adding numeric values to excel sheet
  private void addNumber(WritableSheet sheet, int column, int row, int num)
throws WriteException, RowsExceededException {
 Number number;
 number = new  Number(column, row, num, times);
 sheet.addCell(number);
  }
} 

Here is the output file generated by the above java file:

Output.xls


To use the JExcel API we need to add jxl-2.6.jar which contains all the classes required for reading and writing so don't forget to include it in the project build path.

Sunday 8 September 2013

Reading data from Excel file in Java using JExcel API

In this post we will learn how to read data from Excel file in Java.


Java provides an API for reading the data from excel sheet and it is called JExcel API. Java Excel API is a mature, open source java API enabling developers to read, write, and modify Excel spreadsheets dynamically. 

Here is the excel sheet data which we are going to use for reading:

Example.xls


Below is Java code for reading data, here we have tried to read 3 types of data from excel sheet i.e. String, Number and Date using LabelCell, NumberCell and DateCell:

ReadExcel.java
package com.technsolution;

import java.io.File;
import java.io.IOException;
import java.util.ArrayList;
import java.util.Date;
import java.util.List;

import jxl.Cell;
import jxl.DateCell;
import jxl.LabelCell;
import jxl.NumberCell;
import jxl.Sheet;
import jxl.Workbook;
import jxl.read.biff.BiffException;

public class ReadExcel {

  private String inputFile;

  public void setInputFile(String inputFile) {
    this.inputFile = inputFile;
  }

  public void read() throws IOException  {
    File inputWorkbook = new File(inputFile);
    Workbook w = null;
    List<String> nameRowList = null;
    List<Double> marksRowList = null;
    List<Date> dateRowList = null;
    LabelCell lc;//for cell having String data
    NumberCell nc;//for cell having Numeric data
    DateCell dc;//for cell having date
    
    try {
      w = Workbook.getWorkbook(inputWorkbook);
      // Get the first sheet
      Sheet sheet = w.getSheet(0);

      // Loop over columns  
      for (int j = 0; j < sheet.getColumns(); j++) {
     Cell cell = sheet.getCell(j, 0);
     System.out.println("\n"+"Column Name => "+cell.getContents());//To print column values
     
     if(cell.getContents().equalsIgnoreCase("Name")){
     nameRowList = new ArrayList<String>();
     // Loop over rows
     for (int i = 0; i < sheet.getRows()-1; i++) {
     Cell styleColorVal = sheet.getCell(j, i+1);
     lc = (LabelCell)styleColorVal;
     nameRowList.add(i, lc.getString());
     System.out.println(cell.getContents()+(i+1)+" :: "+nameRowList.get(i).toString()); //To print the row values for Name column
     }      
     }
     
     if(cell.getContents().equalsIgnoreCase("Marks")){
     marksRowList = new ArrayList<Double>();
     // Loop over rows
     for (int i = 0; i < sheet.getRows()-1; i++) {
     Cell styleColorVal = sheet.getCell(j, i+1);
     nc = (NumberCell)styleColorVal;
     marksRowList.add(i, nc.getValue());
     System.out.println(cell.getContents()+(i+1)+" :: "+marksRowList.get(i).toString()); //To print the row values for Marks column
     }      
     }
     
     if(cell.getContents().equalsIgnoreCase("Date")){
     dateRowList = new ArrayList<Date>();
     // Loop over rows
     for (int i = 0; i < sheet.getRows()-1; i++) {
     Cell styleColorVal = sheet.getCell(j, i+1);
     dc = (DateCell)styleColorVal;
     dateRowList.add(i, dc.getDate());
     System.out.println(cell.getContents()+(i+1)+" :: "+dateRowList.get(i).toString()); //To print the row values for Date column
     }      
     }
         
     
      }
    } catch (BiffException e) {
    e.printStackTrace();
    } catch (Exception ex){
    ex.printStackTrace();
    }finally{
    w.close();
    }
  }

  public static void main(String[] args) throws IOException {
    ReadExcel rd = new ReadExcel();
    rd.setInputFile("D:/Example.xls");
    rd.read();
  } 


OUTPUT

Column Name => Name
Name1 :: Rahul
Name2 :: Kiran
Name3 :: Shweta
Name4 :: Raj
Name5 :: Sahil

Column Name => Marks
Marks1 :: 87.0
Marks2 :: 98.0
Marks3 :: 89.0
Marks4 :: 87.0
Marks5 :: 90.0

Column Name => Date
Date1 :: Thu Dec 20 05:30:00 IST 2012
Date2 :: Tue Aug 20 05:30:00 IST 2013
Date3 :: Sat Mar 20 05:30:00 IST 2010
Date4 :: Wed Jun 20 05:30:00 IST 2012
Date5 :: Mon Feb 20 05:30:00 IST 2012


To use the JExcel API we need to add jxl-2.6.jar which contains all the classes required for reading and writing so don't forget to include it in the project build path.

[Note: JExcel API works with Excel file having extension .xls only and not with .xlsx]


Wednesday 4 September 2013

Handling file upload in java using servlet

In this post we will see how to handle file upload in java using servlet. File upload is one of the very extensively used functionality in any application. There are many ways how you can achieve this. However we will be focusing on how it can be achieved via java servlet.


So we will start by writing a Jsp page where user can browse any file from his machine and then click on Upload File button to  upload the file to the destination.

index.jsp

<%@ page language="java" contentType="text/html; charset=ISO-8859-1"
    pageEncoding="ISO-8859-1"%>
<!DOCTYPE html PUBLIC "-//W3C//DTD HTML 4.01 Transitional//EN" "http://www.w3.org/TR/html4/loose.dtd">
<html>
<head>
<meta http-equiv="Content-Type" content="text/html; charset=ISO-8859-1">
<title>File upload form</title>
</head>
<body>
<h3>File Upload:</h3>
Select a file to upload: <br />
<form action="UploadServlet" method="post"
                       enctype="multipart/form-data">
<input type="file" name="file" size="50" />
<br />
<input type="submit" value="Upload File" />
</form>
</body>

</html>

So in the index.jsp file we could see we are calling UploadServlet and the action is post on the form submission. So lets now write our servlet class which will handle the upload functionality. We will be uploading the file to a location which is defined in web.xml as a parameter.

UploadServlet.java


import java.io.*;
import java.util.Iterator;
import java.util.List;

import javax.servlet.*;
import javax.servlet.http.*;

import org.apache.commons.fileupload.FileItem;
import org.apache.commons.fileupload.disk.DiskFileItemFactory;
import org.apache.commons.fileupload.servlet.ServletFileUpload;

public class UploadServlet extends HttpServlet { 
    /**

*/
private static final long serialVersionUID = 1L;

public void doPost(HttpServletRequest req,HttpServletResponse res) throws ServletException,IOException,IOException {
System.out.println("Starting to Upload the file...");
        File file ;
        int maxFileSize = 5000 * 1024;
        int maxMemSize = 5000 * 1024;
        ServletContext context = getServletContext();
        //Getting the upload location from web.xml
        String filePath = context.getInitParameter("file-upload");

        // Verify the content type
        String contentType = req.getContentType();
        if ((contentType.indexOf("multipart/form-data") >= 0)) {
        DiskFileItemFactory factory = new DiskFileItemFactory();
        // maximum size that will be stored in memory
        factory.setSizeThreshold(maxMemSize);
        // Location to save data that is larger than maxMemSize.
        factory.setRepository(new File("c:\\temp"));

        // Create a new file upload handler
        ServletFileUpload upload = new ServletFileUpload(factory);
        // maximum file size to be uploaded.
        upload.setSizeMax( maxFileSize );
        try{ 
        // Parse the request to get file items.
        List fileItems = upload.parseRequest(req);

        // Process the uploaded file items
        Iterator i = fileItems.iterator();

        while ( i.hasNext () ) 
        {
        FileItem fi = (FileItem)i.next();
        if ( !fi.isFormField () )
        {
        // Get the uploaded file parameters
        String fieldName = fi.getFieldName();
        String fileName = fi.getName();
        boolean isInMemory = fi.isInMemory();
        long sizeInBytes = fi.getSize();
        // Write the file
        if( fileName.lastIndexOf("\\") >= 0 )
        {
        file = new File( filePath +"\\"+fileName.substring( fileName.lastIndexOf("\\"))) ;
        }else{
        file = new File( filePath +"\\"+ fileName.substring(fileName.lastIndexOf("\\")+1)) ;
        }
        fi.write( file ) ;
        System.out.println("Uploaded Filename: " + filePath +"\\"+fileName);
        }
        }
        }catch(Exception ex) {
        System.out.println(ex);
        }
        }
}
}


Add the UploadServlet mapping in web.xml and also the location where you want to upload the files to (Upload location). You can notice the file-upload parameter in the web.xml which corresponds to the upload location.

web.xml

<?xml version="1.0" encoding="UTF-8"?>
<web-app xmlns:xsi="http://www.w3.org/2001/XMLSchema-instance" xmlns="http://java.sun.com/xml/ns/javaee" xmlns:web="http://java.sun.com/xml/ns/javaee/web-app_2_5.xsd" xsi:schemaLocation="http://java.sun.com/xml/ns/javaee http://java.sun.com/xml/ns/javaee/web-app_2_5.xsd" id="WebApp_ID" version="2.5">
  <display-name>FileUpload</display-name>
  <welcome-file-list>
    <welcome-file>index.jsp</welcome-file>
  </welcome-file-list>
  
  <context-param> 
    <description>Location to store uploaded file</description> 
    <param-name>file-upload</param-name> 
    <param-value>
         D:\apache-tomcat-6.0.35\webapps\data
     </param-value> 
 </context-param>

    <servlet>
<servlet-name>UploadServlet</servlet-name>
<servlet-class>UploadServlet</servlet-class>
</servlet>
<servlet-mapping>
<servlet-name>UploadServlet</servlet-name>
<url-pattern>/UploadServlet</url-pattern>
</servlet-mapping>

</web-app>

We need to add two jars also to our project that are commons-fileupload-1.2.2.jar and commons-io-2.4.jar. Now you are ready with the file upload functionality and should be able to get it working fine. I hope this post would have helped you.

Sunday 25 August 2013

Hadoop Installation on ubuntu 12.04 (Single Node cluster)

The Apache Hadoop is a framework that allows for the distributed processing of large data sets across clusters of computers using simple programming models. It is designed to scale up from single servers to thousands of machines, each offering local computation and storage. Rather than rely on hardware to deliver high-availability, the library itself is designed to detect and handle failures at the application layer, so delivering a highly-available service on top of a cluster of computers, each of which may be prone to failures.


In this tutorial we are going to learn how to install Hadoop single node cluster on Ubuntu 12.04.

Before getting started with hadoop installation we need to make sure the java is installed on our system. In this tutorial i am going to install java7 on my machine you can go with java6 also.

Install oracle java 7 via PPA repository. Use the following commands:

$sudo add-apt-repository ppa:webupd8team/java
$sudo apt-get update
$sudo apt-get install oracle-java7-installer
$sudo update-java-alternatives -s java-7-oracle

To check if the java is correctly installed or not and what is the version installed type in the folloeing command:
$java -version

To install you can either create a new hadoop user or you can use your current itself. I am going with the second approach. So in this article i will be using user "shakeel" which is my default and only user in ubuntu.

Install SSH Server if not already present. This is needed as hadoop does an ssh into localhost for execution.
$sudo apt-get install openssh-server
$ssh-keygen -t rsa -P ""
$cat $HOME/.ssh/id_rsa.pub >> $HOME/.ssh/authorized_keys

The final step is to test the SSH setup by connecting to your local machine with the shakeel user. The step is also needed to save your local machine’s host key fingerprint to the shakeel user’s known_hosts file.
$ssh localhost

Disable IPV6

$sudo gedit /etc/sysctl.conf
Paste the below lines at the end of the file :
#disable ipv6
net.ipv6.conf.all.disable_ipv6 = 1
net.ipv6.conf.default.disable_ipv6 = 1
net.ipv6.conf.lo.disable_ipv6 = 1

For these configurations to take effect normally you need to reboot the system. But you can aloo re-initialize the configurations without rebooting the system by executing below command:
$sudo sysctl -p

To make sure that IPV6 is disabled, you can run the following command:
$cat /proc/sys/net/ipv6/conf/all/disable_ipv6
The printed value should be 1, which means that is disabled.

HADOOP Installation

As all the basic settings for hadoop installations are done now we need to proceed with hadoop installation. You can download hadoop package from the Apache downloads http://www.apache.org/dyn/closer.cgi/hadoop/core.
I downloaded hadoop-1.0.4.tar.gz.

Copy the tar file to your user directory. 
$cd /home/shakeel

Untar all the contents of the tar file.
$sudo tar xzf hadoop-1.0.4.tar.gz

To keep the things simple we are renaming hadoop-1.0.4 to hadoop
$sudo mv hadoop-1.0.4 hadoop

Open .bashrc file
$sudo gedit /home/shakeel/.bashrc

Now add the HADOOP_HOME environment variable to your .bashrc which corresponds to the dirctory where you have extracted hadoop-1.0.4.tar.gz contents i.e. hadoop.
export HADOOP_HOME=/home/shakeel/hadoop

Add JAVA_HOME environment variable also at the end of .bachrc file
export JAVA_HOME=/usr/lib/jvm/java-7-oracle

Add the $HADOOP_HOME/bin to $PATH. By doing this you can start and stop hadoop cluster (run start-all.sh or stop-all.sh) from any of the directory without actually navigating to bin directory of hadoop and executing it.
export PATH=$PATH:$HADOOP_HOME/bin

Open a new terminal window and check if the hadoop home, java home and path is set properly and contains the changes that you have made to them
$echo $HADOOP_HOME
$echo $JAVA_HOME
$echo $PATH

Update JAVA_HOME in hadoop-env.sh
$sudo gedit /home/shakeel/hadoop/conf/hadoop-env.sh
replace # export JAVA_HOME=/usr/lib/j2sdk1.5-sun with
export JAVA_HOME=/usr/lib/jvm/java-7-oracle
Make sure to remove "#" which is placed at the begining of the command.

Create Temprory directory for hadoop
$sudo mkdir /home/shakeel/tmp

Open the core-site.xml and add the following between <configuration> .. </configuration> tags.
$sudo gedit /home/shakeel/hadoop/conf/core-site.xml
<property>
<name>hadoop.tmp.dir</name>
<value>/home/shakeel/tmp</value>
<description>A base for other temporary directories.</description>
</property>
<property>
<name>fs.default.name</name>
<value>hdfs://localhost:54310</value>
<description>The name of the default file system. A URI whose
scheme and authority determine the FileSystem implementation. The
uri’s scheme determines the config property (fs.SCHEME.impl) naming
the FileSystem implementation class. The uri’s authority is used to
determine the host, port, etc. for a filesystem.</description>
</property>

Open the mapred-ste.xml and add the following between <configuration> .. </configuration> tags.
$sudo gedit /home/shakeel/hadoop/conf/mapred-site.xml
<property>
  <name>mapred.job.tracker</name>
  <value>localhost:54311</value>
  <description>The host and port that the MapReduce job tracker runs
  at.  If "local", then jobs are run in-process as a single map
  and reduce task.
  </description>
</property>

Open the hdfs-site.xml and add the following between <configuration> .. </configuration> tags.
$sudo gedit /home/shakeel/hadoop/conf/hdfs-site.xml
<property>
  <name>dfs.replication</name>
  <value>1</value>
  <description>Default block replication.
  The actual number of replications can be specified when the file is created.
  The default is used if replication is not specified in create time.
  </description>
</property>

Next step is formatting the HDFS filesystem via NameNode (which simply initializes the directory specified by the dfs.name.dir variable that corresponds to ${hadoop.tmp.dir}/dfs/name on the local filesystem )
Don't run this command when the system is running and its done only at the first time during installation.
$/home/shakeel/hadoop/bin/hadoop namenode -format

To start the hadoop server navigate to bin directory of hadoop
$cd /home/shakeel/hadoop/bin/

Type in the command
$./start-all.sh
or if you have PATH variable appended with the HADOOP_HOME/bin you can directly use below command from anywhere:
$start-all.sh
Once all the process are started go to logs and check if the logs doesn't have any exceptions in it.

To check what all processes are running you can type in:
$jps

Output should be something like:
3435 NameNode
5645 DataNode
6766 SecondaryNameNode
6788 JobTracker
6567 TaskTracker
3445 jps
If you find any of the process missing from the above mentioned processes than it means there was some error with the starting of hadoop cluster. Go and check all the logs for verifying the cause for it.

Hadoop comes with several web interfaces which are by default (see conf/hadoop-default.xml) available at these locations:
http://localhost:50070/  --> web UI of the NameNode daemon
http://localhost:50030/  --> web UI of the JobTracker daemon
http://localhost:50060/  -->  web UI of the TaskTracker daemon
Make sure all these links are working fine which means your single-node hadoop cluster was installed successfully on your machine.

To stop the hadoop server use the below command :
$./stop-all.sh
or
$stop-all.sh

I hope this would have helped you in installing the single-node hadoop cluster on Ubuntu.
My next post would be on installing HBase over HDFS.

References:
http://www.michael-noll.com/tutorials/running-hadoop-on-ubuntu-linux-single-node-cluster/
http://mysolvedproblem.blogspot.com/2012/05/installing-hadoop-on-ubuntu-linux-on.html

Monday 19 August 2013

Tomcat server setup on windows

Tomcat an open source web server and servlet container developed by the Apache Software Foundation. Tomcat implements the Java Servlet and the JavaServer Pages and provides a "pure Java" HTTP web server environment for Java code to run in

This post will help you setup a tomcat server on your windows machine.

For setting up tomcat we need to first download the binary distribution zip file from the apache site. Download the latest version or the required version of zip file from http://tomcat.apache.org/download-60.cgi

dwnldLocImg

Unzip it and place it on any of the drives.

Now you need to add a new environment variable JAVA_HOME if it is not already present on yor machine. Please make sure it points to the JDK installed on your machine.

For example: in my case:  JAVA_HOME=C:\Program Files\Java\jdk1.6.0

envVarImg
Now go to bin folder under the unzipped apache-tomcat-6.0.36 folder and run startup.bat to start tomcat server. A console will open and once you see “INFO: Server startup in XX ms” it means the server is started . 
cmdPrmptImg

On your browser type http://localhost:8080/ and if you see the apache tomcat server page it means you've setup Tomcat successfully.

Sunday 18 August 2013

Installation of Apache Directory for creating LDAP server

This post will show you how to install Apache Directory to create a LDAP server and insert few user records in it which will be used as LDAP authentication for our application.

Firstly we need to download the Apache Directory studio, please visit apache site http://directory.apache.org/studio/download/download-windows.html and download the required version.

Once it is downloaded double click on the exe and follow the steps given below:


Now your installation of Apache directory is done. We will now create an LDAP server on it.

For creating a LDAP server  open the apache directory and go to the LDAP Servers tab and right click --> New --> New Server


Give your server a name and choose one of the listed apache foundation servers and click finish

You can view the configuration properties of your server by right clicking on the server --> Open Configuration. These properties will be used while connecting to the applications.

Now you need to start the server. Right click on the server --> run.

Once the server is started. Right click on the server and create a new LDAP connection by clicking --> Create a connection.

You will get a message for the creation of the new server.

Once the connection is created now we are going to add few user credentials for this go to the LDAP browser and expand DIT --> ou=system --> ou=users as shown below. Right click on ou=users --> New  --> New Entry.

Create entry from scratch --> Next

Select inetOrgPerson from the available object classes --> Add --> Next.

For RDN select uid from the list and enter a username against it. It should be a unique value. This will act as the user for your application.

Update sn and cn value where sn = surname and cn = common name.


As we need a password also for the user against which the user will be authenticated we have to add a new attribute for the password. Right click --> New Attribute


Select userPassword from the list --> Next --> finish.

Enter the password in the Password Editor and press OK.

Now the user has been added to the directory and you can use it for the LDAP authentication. You can now access your LDAP server at ldap://localhost:10389 (see server configurations). Hope this will help you.